Pages

Wednesday, April 13, 2011

Push not synching in Corporate Sync but manual sync does

Steps followed to fix Corporate Sync in Motorola Droid X (2.2) synching issue when you can manually sync but push sync is not automatically syncing.

Within your email account press Menu button
Select Email settings-> Email Delivery
Select Data push
Make sure "sync over WiFi only" is NOT selected

From the home screen
Menu button-> Settings-> Battery Manager
Select Performance Mode

From the home screen
Menu button-> Settings-> Wireless & networks
Check Airplane mode (green check when on)
Uncheck Airplane mode

Tuesday, March 29, 2011

Outlook hangs after install kb2412171 or Outlook 2007 crash with Event ID 1000 and 1001

You can try fixing this by closing outlook, going to C:\Program Files\Common Files\Microsoft Shared\OFFICE12.

Locate mso.dll, cut and paste it to your desktop. If it does not let you then reboot and do this before you open outlook. Then launch outlook.

The MSI installer will launch it will run for a minute and then it will open Outlook.

If that doesn't correct the issue, uninstall KB2412171.

Friday, March 18, 2011

How to disable email redirection for a single BlackBerry smartphone user on the BlackBerry Enterprise Server

To disable email redirection for a single BlackBerry® smartphone user, complete the following

For BlackBerry Enterprise Server 5.0 to 5.0 SP1:

1. In the BlackBerry Administration Service, on the BlackBerry solution management menu, expand User.
2. Click Manage users.
3. Search for a user account.
4. Click the Display name for the user account.
5. Click Edit user.
6. On the User Information tab, in the Messaging configuration section, click Default configuration.
7. In the Email services settings section, on the Redirect to BlackBerry device drop-down list, click No.
8. Click Continue to user information edit.
9. Click Save all. This will stop email messages from being forwarded to the BlackBerry smartphone.


Source
http://www.blackberry.com/btsc/search.do?cmd=displayKC&docType=kc&externalId=KB11841

Friday, March 04, 2011

Messenger Link Reviver for Windows Live Messenger 2009

Recently, Microsoft disabled web links in Windows Live Messenger 2009 citing it to be a temporary measure to a malicious worm. Therefore links now appear as just text and need to be copy/pasted to your browser manually. One can debate the effectiveness of this action as Messenger already had the ability to simply not deliver links meeting a certain criteria, but it seems they've given up on this original functionality and now rely on the SmartScreen link redirector exclusively in Windows Live Messenger 2011.

So for those who wish to use Windows Live Messenger 2009 and still have the ability to click on links use Messenger Link Reviver.

Download the Messenger Link Reviver zip file and run the application. Click Start to apply the Reviver changes and Messenger will automatically restart. You should now be able to click on links again.

Source

Offline / Full Installer Windows Live Messenger Download Links

Windows Live Messenger 2009 Build 14.0.8064.206


Windows Live Messenger 2009 (Build 14.0.8089.726) – WITH Show My Webcam


Windows Live Messenger 2009 (Build 14.0.8117.416) – WITHOUT Show My Webcam

Windows Live Messenger 2011 (15.4.3502.922)

How to user older version of Windows Live Messenger

1. Download a previous version of WLM

2. Use ZapMessenger to uninstall any version of Messengers on your computer except 2011. For 2011 or if you have issues with ZapMessenger use Messenger Deep Clean

3. Install your WLM

4. Download Resource Hacker, extract and run ResHacker.exe

5. Go to File->Open and browse the to any of the following locations:

C:\Program Files\MSN Messenger\msnmsgr.exe

C:\Program Files\Window Live\Messenger\msnmsgr.exe

C:\Program Files (x86)\Windows Live\Messenger\msnmsgr.exe

6. Expand Version Info and Expand 1

7. Click on 1033

8. Change the ProductVersion (and any other place that has the same number) to 15.4.3508.1109

9. Click Compile Script

10. Go to File->Save and close Resource Hacker.


Note that if you get a message that you don't have permissions to save to folder, save the file to your desktop. Navigate to C:\Program Files (x86)\Windows Live\Messenger\and rename msnmsgr.exe to msnmsgr_bak.exe. Now move your msnmsgr.exe from your desktop to C:\Program Files (x86)\Windows Live\Messenger folder.


Download links

ZapMessenger

Messenger Deep Clean

.NET Framework 2.0

Resource Hacker

Windows Live Messenger 2009 Build 14.0.8064.206

How to disable the “uninstall password” to uninstall Symantec Antivirus

1. Open Registry Editor (regedit).
2. Navigate to the following registry key:

HKEY_LOCAL_MACHINE\SOFTWARE\INTEL\LANDesk\VirusProtect6\CurrentVersion\Administrator Only\Security\

3. Change the value for useVPuninstallpassword key from 1 to 0.
4. Exit Registry Editor and now you can uninstall Symantec AntiVirus Client.

Thursday, February 17, 2011

Windows 7 welcome screen


The Windows 7 welcome screen follows pretty much the pattern introduced in Windows Vista. Many users still prefer the classic welcome screen from Windows XP. This guide explains how to change the Windows 7 default settings to customize theWindows 7 welcome screen to look more like the classic welcome screen.

The picture shown below shows the default logon welcome screen in Windows 7 and Windows Vista.
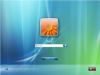
Vista welcome screen

You can change the default Windows 7 and Vista login welcome screen to a login screen that is more like the secure login screen known from Windows XP as shown in the following print screen:

Windows 7 classic welcome screen

This setup requires the user to press the combination of CTRL + ALT + DELETE keys before entering user name and password.

How to disable the default Welcome screen in Windows 7?

The Windows 7 welcome screen can be disabled and changed back to the CTRL + ALT + DEL type login screen through the several following settings.

Control Panel
-> User Accounts
  -> Manage User Accounts
   -> UAC prompt
    -> Advanced

Some versions of Windows (such as Home and Premium) do not provide this path, so depending on the version of your Windows, try the following two command line utilities.

Start
-> Run
  -> netplWiz.exe (program located in %systemroot%\system32\)
      or control userpasswords2
      Either of these programs should take you to the screen mentioned above.

Check the Require users to press Ctlr+Alt+Delete check box in the Secure logon section of the User Accounts screen, click OK.
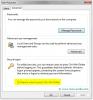
Require users to press Ctlr+Alt+Delete

After changing the setting, reboot your computer. The next time you start your Windows 7, you should see the welcome screen with the message asking you to press the combination of Ctrl+Alt+Delete keys.

The check box to disable Windows 7 welcome screen is disabled

If you are using a computer with Active Directory cached domain accounts, the check box shown in the previous print screen might be grayed out not allowing you to make any changes to it. In this case, the setting needs to be modified through the group policy.

Disable the default Windows 7 welcome screen through group policy editor

Depending on the version of your Windows, you might need to change the Windows 7 welcome screen setting through the group policy editor.

Start
-> Run
  -> Type gpedit.msc and hit Enter
   -> Navigate to the following policy

Local Computer Policy\Computer Configuration\Windows Settings\Security Settings\Local Policies\Security Options\

Set the Interactive logon: Do not require CTRL+ALT+DEL to disabled.
Set the Interactive Login: Do not display last user name to enabled.

Then navigate to the following policy to disable fast user switching functionality.

Local Computer Policy\Computer Configuration\Administrative Templates\System\Logon

Set the HideFastUserSwitching policy to enabled.

Also change the classic logon policy.

Set the Always use classic logon to enabled.

Disabling the Windows 7 welcome screen does not work

Some users have reported that the above settings did not provide what they needed. In that case, we also suggest checking the following settings through the registry editor.

Start
-> Run
  -> Type regedit and hit Enter
   -> Locate the following keys and check their values

HKEY_LOCAL_MACHINE\Software\Microsoft\Windows\CurrentVersion\Policies\System
  DisableCAD = 0
  LogonType = 0
  HideFastUserSwitching = 1
  DontDisplayLastUserName = 1

HKEY_LOCAL_MACHINE\SOFTWARE\Microsoft\Windows NT\CurrentVersion\Winlogon
  DisableCAD = 0
  LogonType = 0

windows 2000
System Key: [HKEY_LOCAL_MACHINE\SOFTWARE\Microsoft\Windows\CurrentVersion\Policies\
Explorer]
Value Name: NoWelcomeScreen
Data Type: REG_DWORD (DWORD Value)
Value Data: (0 = default, 1 = hide)

Windows 7 welcome screen on domain-joined computers

Computers that are joined to an Active Directory domain behave a bit differently than stand-alone home configurations. After getting through the CTRL+ALT+DEL login screen upon logging into your computer, Windows displays one or two icons (depends on your configuration). You are presented with the text boxes for entering your user name and password only after you click the icon on this screen. Many experts consider this a flaw in the design of Windows.

Source

http://www.maxi-pedia.com/Windows+7+welcome+screen

Thursday, December 16, 2010

How to Manually Update Defs in Vipre 4.0

This process does not work in Enterprise 4.0.


Here are instructions to manually update the definitions for Vipre Enterprise.

Manually download definitions for VIPRE

To manually update the definitions from the server:

1. Copy the file CSE3-EN-XXXX-F.sbr.sgn (Found in the ThreatDB subfolder under the Enterprise installdir) to a folder other than the ThreatDB.

2. Change the extension to .rar

3. Unrar the file

4. Stop the agent service (Sunbelt VIPRE Antivirus service) on the client box 5. Copy the entire contents into the following folder on the agent box:

C:\Program Files\Sunbelt Software\SBEAgent\Definitions (If C: is the default drive where software gets installed) 6. Double-click on SBAMTray.exe (located in the SBEAgent installdir) to restart the agent

To manually update agent definitions from the internet:

1. Download the latest definition release from http://www.sunbeltsoftware.com/Busin...e/Definitions/

2. Run the following command from a command prompt, substituting c:\temp for the directory that the definition sbr.sgn was downloaded to:

C:\Program Files\Sunbelt Software\SBEAgent>SBAMCommandLineScanner.exe /applydefs Manual definitions download link http://www.sunbeltsoftware.com/Busin...e/Definitions/

Update definitions for agents manually VIPRE To update definitions manually:

Download the latest definition release from http://www.sunbeltsoftware.com/Busin...e/Definitions/

Run the following command from a command prompt, substituting c:\temp for the directory that the definition sbr.sgn was downloaded to:

C:\Program Files\Sunbelt Software\SBEAgent>SBAMCommandLineScanner.exe /applydefs c:\temp\

Thursday, October 21, 2010

How to turn off Internet Explorer Enhanced Security Configuration in Windows Server 2008


  • First, open the Server Manager by going to Start > Server Manager
  • In the Server Manager browse to the Security Information section and click Configure IE ESC. In the figure below, IE ESC is located in the very lower right-hand corner of the window.

    Server Manager

  • In the Internet Explorer Enhanced Security Configuration window decide for whom you want IE ESC enabled or disabled and click OK.
    IE ESC options
  • Thursday, September 23, 2010

    Free Public DNS Server

    Free Public DNS Server

    Service provider: Google

    • 8.8.8.8
    • 8.8.4.4

    Service provider:OpenDNS
    OpenDNS free dns server list:

    • 208.67.222.222
    • 208.67.220.220

    Service provider: ScrubIt
    Public dns server address:

    • 67.138.54.100
    • 207.225.209.66

    Service provider:dnsadvantage
    Dnsadvantage free dns server list:

    • 156.154.70.1
    • 156.154.71.1

    Service provider: vnsc-pri.sys.gtei.net
    Public Name server IP address:

    • 4.2.2.1
    • 4.2.2.2
    • 4.2.2.3
    • 4.2.2.4
    • 4.2.2.5
    • 4.2.2.6

    Other....

    Verizon (Reston, VA, US)
    151.197.0.38
    151.197.0.39
    151.202.0.84
    151.202.0.85
    151.202.0.85
    151.203.0.84
    151.203.0.85
    199.45.32.37
    199.45.32.38
    199.45.32.40
    199.45.32.43

    GTE (Irving, TX, US)
    192.76.85.133
    206.124.64.1

    One Connect IP (Albuquerque, NM, US)
    67.138.54.100

    Exetel (Sydney, AU)
    220.233.167.31

    VRx Network Services (New York, NY, US)
    199.166.31.3

    SpeakEasy (Seattle, WA, US)
    66.93.87.2
    216.231.41.2
    216.254.95.2
    64.81.45.2
    64.81.111.2
    64.81.127.2
    64.81.79.2
    64.81.159.2
    66.92.64.2
    66.92.224.2
    66.92.159.2
    64.81.79.2
    64.81.159.2
    64.81.127.2
    64.81.45.2
    216.27.175.2
    66.92.159.2
    66.93.87.2

    Sprintlink (Overland Park, KS, US)
    199.2.252.10
    204.97.212.10
    204.117.214.10

    Cisco (San Jose, CA, US)
    64.102.255.44
    128.107.241.185


    OpenNIC
    202.83.95.227 (au)
    119.31.230.42(au)
    178.63.26.173 (de)
    217.79.186.148 (de)
    27.110.120.30(nz)
    89.16.173.11 (uk)
    69.164.208.50 (us)
    216.87.84.211(us)
    2001:470:8388:10:0:100:53:20 (us)
    2001:470:1f10:c6::2 (us)

    How do I change or setup DNS server IP address?

    Visit below mentioned site to setup DNS as per your operating system:

    Friday, September 17, 2010

    How To Create VLAN in HP Procurve Switches

    Follow the following steps

    Cofig t

    vlan 125
       name "VLAN125"
       untagged 1-12
      ip address 10.50.0.5 255.255.254.0
       tagged 25-26
       exit
    vlan 100
       name "VLAN100"
    untagged 13-24
      ip address 10.0.0.98 255.255.248.0
       tagged 25-26
       exit
    ip routing

    wri mem

    ####

    tagged 25-26 is equivalent to trunking for Cisco Switches

    untagged command make the required ports to be the part of vlan you want.
    From the above example ports 1 - 12 are part of vlan 125 & port 13-24 are part of vlan 100.
    and ports 25 & 25 are trunk ports can carry vlan information for vlan 25 & 100
    make sure you configure ip routing to en bale intervlan routing

    Thursday, August 26, 2010

    Increasing System Performance Without Adding Memory in Windows 7


    A good link on improving system performance for Windows computer.

    http://h10025.www1.hp.com/ewfrf/wc/document?docname=c01817290&tmp_track_link=ot_faqs/top_issues/en_us/c01817290/loc:10&lc=en&dlc=en&cc=us&product=4007138&lang=en

    To free resources and keep the computer running correctly, follow a maintenance schedule as listed below.
    Recommended maintenance schedule
    Daily tasks Weekly tasks Monthly tasks Quarterly tasks
    Manage e-mail

    • Delete e-mail from unknown sources.
    • Do not open attachments that you do not trust.
    • Organize e-mail.
    Protect against viruses, adware, and spyware

    • Update definition files or schedule a weekly automatic update.
    • Run a full virus, adware, and spyware scan or schedule a weekly automatic scan.
    Use Windows Update

    Check for updates or schedule a monthly automatic update.
    Set new passwords
      Optimize system performance

    Review the Start menu

    Set the Start menu to open only needed applications.
    Clean the computer, monitor, keyboard, and mouse

    Use a portable vacuum to remove dust and debris from ventilation areas.
      Clean up Web browser files

    • Delete cookies.
    • Delete cache.
    • Delete history files.
    Clean up the desktop

    Delete or remove unneeded icons and software programs.


    Thursday, August 19, 2010

    System File Checker


    1. Copy the i386 folder from a Windows XP cd that is the same version you are running.

    2. Copy the following into notepad and save as i386Path.reg

        Windows Registry Editor Version 5.00
        [HKEY_LOCAL_MACHINE\SOFTWARE\Microsoft\Windows\CurrentVersion\Setup]"SourcePath"="c:\\"
        [HKEY_LOCAL_MACHINE\SOFTWARE\Microsoft\Windows NT\CurrentVersion]"SourcePath"="c:\\"

    3. At the run line type

    sfc  /scannow


    Source: http://www.updatexp.com/scannow-sfc.html

    Friday, August 06, 2010

    How to keep mapped drives connected

    Two solutions to keep mapped drives connected (live)

    1. Change the setting on the NIC

    A. Right click NIC and select Properties

    B. On the Power Management tab uncheck “Allow the computer to turn off this device to save power.”

    2. Registry hack

    A. [HKEY_LOCAL_MACHINE\System\CurrentControlSet\Services\Tcpip\Parameters]

        a. Create new REG_DWORD KeepAliveTime and set it to 00300000

        b. Create new REG_DWORD KeepAliveInterval and set it to 00001000

    What this does is that it sends keep alive packets every 5 minutes to the server you are mapped to making the connection live and not idle.

    Friday, July 23, 2010

    How To Pin a Network Shortcut to Taskbar in Windows 7


    By default, Windows 7 will not allow you to pin a shortcut to a network program to the taskbar.

    Follow these steps to get around the default.

    1. Copy the .exe to your local drive.
    2. Make a shortcut of the local .exe on your desktop.
    3. Pin the new local shortcut to your taskbar.
    4. Right-click the pinned item on the taskbar, then right-click the shortcut in the jump list.
    5. Click Properties, and edit the Target and Start-in fields so they point to the network location.
    6. Delete the .exe you copied locally and remove the shortcut you created on your desktop.

    You should now have a pinned shortcut on the taskbar to a network location.

    Friday, July 02, 2010

    Microsoft Office Outlook cannot provide form scripting support This feature is not available

    If you get the following error message in Outlook on a Terminal Server, do the following:
    Run this from a command prompt: msiexec /i [GUID] ADDLOCAL=OutlookVBScript /qb

    You need to find out what GUID your Office version have. The easiest way to do that is to open Regedit and start a search from this key:
    HKLM/Software/Microsoft/Windows/Current Version/Uninstall

    All GUID’s start with a brace ({). Search for Office and you will find the right key. So, for example, if you run Office Outlook 2007 Proffessional Plus you would run this:
    msiexec /i {90120000-0011-0000-0000-0000000FF1CE} ADDLOCAL=OutlookVBScript /qb

    Monday, June 28, 2010

    How to Disable BES / BAS 5 Redirection

    In BAS 5, select user.

    In Messaging configuration section, click Default configuration.

    Click Edit user.

    Change Redirect to BlackBerry device from Yes to No.

    Click Continue to user information edit.

    Click Save all.

    Thursday, June 24, 2010

    Delete a Service

    Normally it should not be necessary to manually delete a service. Uninstalling an application should remove its associated service (if any).

    However, should it be necessary to manually remove a service:

    1. Run Regedit or regedt32.
    2. Fnd the registry entry:

                HKEY_LOCAL_MACHINE/SYSTEM/CurrentControlSet/Services

    1. Find the service there and delete it.
      You may wish to look at the keys and see what files the service was using and perhaps delete them also.

    or

    From CMD

     
    1. Start->Run and type cmd in the Open: line. Click OK.
    2. Type: sc delete <service name>
    3. Reboot the system


    Note:

    • You will have to reboot before the list gets updated in server manager.
    • I have had it pointed out that some programs are cunning and prevent you from removing their service easily. (For example the spyware\malware called ‘Command Service’ - "cmdService".) These change the permissions to make it more difficult for you to delete them. For these you will have to right click on the ‘service’ in regedit (regedt32), go to permissions and grant the administrator full control before the service can be deleted.

    How to install or upgrade the MAPI Interface Client and CDO 1.2.1

    Overview

    To install the Microsoft Exchange Server Messaging Application Programming Interface (MAPI) Client and Collaboration Data Object (CDO) 1.2.1 without Microsoft Exchange System Manager or the Microsoft Exchange Server MAPI Client and CDO previously installed, complete the following steps:

    1. Download ExchangeMapiCdo.EXE from www.microsoft.com.
    2. Double-click ExchangeMapiCdo.EXE to extract the ExchangeMapiCdo.MSI file.
    3. Double-click ExchangeMapiCdo.MSI to open the file and follow the prompts to install the Microsoft Exchange Server MAPI Client and CDO 1.2.1.
    4. Restart the BlackBerry Enterprise Server.

    Important: Restarting certain BlackBerry Enterprise Server services delays email message delivery to BlackBerry smartphones. For more information, see KB04789.

    Update a previous MAPI Client to Microsoft Exchange Server MAPI Client and CDO 1.2.1

    To update to the Microsoft Exchange Server MAPI Client and CDO 1.2.1 from a MAPI client pack or Microsoft Exchange System Manager, complete the following steps:

    1. Download ExchangeMapiCdo.EXE from www.microsoft.com.
    2. Stop all BlackBerry Enterprise Server and Windows NT® services or processes that use the MAPI32.DLL file. For more information, see KB13718.
    3. Remove the Microsoft Exchange System Manager or the Microsoft Exchange Server MAPI Client and CDO's installed on the computer using the Add or Remove Programs tool in Control Panel.
    4. Locate the following files and rename them with the file extension .old:
      • MAPI32.DLL
      • EMSMDB32.DLL
      • EMSABP32.DLL
      • CDO.DLL
        • NOTE: If dealing with a 64-bit Operating System DO NOT modify the above files if located in the C:\Windows\SysWOW64 directory.
    5. Locate the fixMAPI.exe file in the System32 directory.
    6. Double-click the fixMAPI.exe file.
    7. Double-click ExchangeMapiCdo.EXE to extract the ExchangeMapiCdo.MSI file.
    8. Double-click ExchangeMapiCdo.MSI to and follow the prompts to install the Microsoft Exchange Server MAPI Client and CDO 1.2.1
    9. Start all the BlackBerry Enterprise Server services.
    10. Update the MAPI Profile by following:
    For BlackBerry Enterprise Server 4.0, 4.1, and 5.0
    1. Go to Start > Programs > BlackBerry Enterprise Server > BlackBerry Server Configuration.
    2. On the BlackBerry Server tab, click Edit MAPI Profile
    3. Type the name of the Microsoft Exchange Server and the BlackBerry Enterprise Server service account mailbox name.
    4. Click Check Name.
    5. Click Apply > OK.

    Important: Restarting certain BlackBerry Enterprise Server services delays email message delivery to BlackBerry smartphones. For more information, see KB04789.

    Note: The Microsoft Exchange 2000 or Microsoft Exchange 2003 CD-ROM might be required in order to uninstall Microsoft Exchange System Manager. If the end user license agreement does not appear during installation of the Microsoft Exchange Server MAPI Client and CDO 1.2.1, or the MAPI32.DLL file is 600 KB or more, the Microsoft Exchange Server MAPI Client and CDO 1.2.1 did not install correctly. The installation appears to have completed successfully, but the Program Files\ExchangeMAPI directory is not installed and the MAPI client is not updated. This occurs if all of the MAPI files were not renamed with the .old file extension before installation.


    Additional Information

    To verify the successful installation of the Microsoft Exchange Server MAPI Client and CDO 1.2.1, complete the following steps:

    1. Verify that the ExchangeMAPI folder was created in the Program Files folder. The ExchangeMAPI folder contains a selection of .DLL files.
    2. In the BlackBerry Messaging Agent (MAGT) logs, verify the following [ENV] environment variables are reported:
      • [ENV] MAPI32.DLL: C:\Windows\System32\MAPI32.DLL, Version: 1.0.2536.0
      • [ENV] CDO.DLL: C:\Program Files\ExchangeMAPI\ Version: CDO.DLL, 6.5.8165.0
      • [ENV] EMSMDB32.DLL: C:\Program Files\ExchangeMAPI\ EMSMDB32.DLL, Version: 6.5.8165.0

    Note: The file directories listed in the logs contain the version of the files, and the currently available version may be newer than what is listed above.

    From http://www.blackberry.com/btsc/viewContent.do?externalId=KB15779&sliceId=1