Universal:
x.T|*xx
Default without having to dial 9 for a four digit extension:
[0-8]xxxT3|911|411|611|011xxx.T3|1xxxxxxxxxx|[2-9]xxxxxxxxx|*xxx.T3
The default but with the ability to test providers by dial 55 then phone number:
[0-8]xxxT3|55xxx.T|911|411|611|011xxx.T3|1xxxxxxxxxx|[2-9]xxxxxxxxx|*xxx.T3
Sources
http://apetec.com/voip/Polycom-DialPlan.htm
http://blog.voipdiy.com/2012/10/what-is-dial-plan.html
https://wiki.asterisk.org/wiki/display/DIGIUM/Dial+Plans
http://wiki.voip.ms/article/Dial_Plan_for_Linksys_ATAs
http://voipstuff.net.au/dial-plans/
Thursday, April 09, 2015

Friday, March 27, 2015
HP Customized ESXi Image and HP Server Support Matrix
As of 3/27/2015
- ESXi and vSphere:
- vSphere 6.0 March 12, 2015 - Download here
- vSphere 5.5 U2 Nov 2014 - Download here
- vSphere 5.5 U1 Dec 2014 - Download here
- vSphere 5.5 June 2014 - Download here
- vSphere 5.1 U3 Dec 2014 - Download here
- vSphere 5.1 U2 Nov 2014 - Download here
- vSphere 5.1 U1 Sept 2013 - Download here
- vSphere 5.1 Feb 2013 - Download here
- ESXi 5.0 U3 Nov 2014 - Download here
- ESXi 5.0 U2 Sept 2013 - Download here
- ESXi 5.0 U1 Oct 2012 - Download here
- ESXi 4.x - Download here
- Contents of above images available here
http://h17007.www1.hp.com/us/en/enterprise/servers/supportmatrix/vmware.aspx
Source
http://www8.hp.com/us/en/products/servers/solutions.html?compURI=1499005#tab=TAB4
Tuesday, March 24, 2015
Moving Firefox profile to new computer
- Completely close firefox on your old computer
- Copy the profile folder on old computer (C:\Windows\Profiles\
\Application Data\Mozilla) to the location where you want to new computer C:\Windows\Profiles\\Application Data\Mozilla. - Start the Profile Manager by typing the following in Start
firefox.exe -P - Click on the "Create Profile..." button.
- In the dialog that opens, enter a descriptive name for the profile.
- Click on the "Choose Folder..." button. A "Browse for Folder" dialog will open.
- Select the profile folder you copied and click OK.
- Review the path shown in the "Completing the Create Profile Wizard" dialog to make sure it is correct, then click "Finish" to create the new profile.
- Select the new profile and press the Start button to start Firefox using the moved profile.

http://kb.mozillazine.org/Moving_your_profile_folder
Monday, March 16, 2015
Excel or Outlook takes a long time opening file
1. Click Start then click Computer.
2. Click Organize.
3. Select Layout, and then click to clear Preview pane.
4. Open the Excel workbook and test.
If the error continues to occur, go to the next method.
Windows Explorer:
1. Right click on Start button
2. Click Open Windows Explorer
3. Click Organize | Layout
4. Uncheck Details Pane and Preview Pane
Excel:
1. Click File | Open
2. Click Organize | Layout
3. Uncheck Details Pane and Preview Pane
Outlook:
1. Open a new e-mail
2. In the "Include" group on the Ribbon, click
Attach File
3. Click Organize | Layout
4. Uncheck Details Pane and Preview Pane
Source
https://support.microsoft.com/en-us/kb/2779852
http://geniustechbar.blogspot.com/2013/03/excel-cannot-complete-this-task-with.html
Source
https://support.microsoft.com/en-us/kb/2779852
http://geniustechbar.blogspot.com/2013/03/excel-cannot-complete-this-task-with.html
Wednesday, February 18, 2015
CodeTwo Active Directory Photos
A nice free tool for importing photos into Active Directory. The tool can be run from any computer which were the user is logged int an account with administrative rights.
CodeTwo Active Directory Photos
http://www.codetwo.com/freeware/active-directory-photos/
CodeTwo Active Directory Photos
http://www.codetwo.com/freeware/active-directory-photos/
Tuesday, February 17, 2015
How to Unprotect an excel sheet without password
In Excel on the Developer Tabs press View Code
Copy and paste the following. When Done press F5 to Run code. The sheet is unprotected now.
Sub PasswordBreaker()
'Breaks worksheet password protection.
Dim i As Integer, j As Integer, k As Integer
Dim l As Integer, m As Integer, n As Integer
Dim i1 As Integer, i2 As Integer, i3 As Integer
Dim i4 As Integer, i5 As Integer, i6 As Integer
On Error Resume Next
For i = 65 To 66: For j = 65 To 66: For k = 65 To 66
For l = 65 To 66: For m = 65 To 66: For i1 = 65 To 66
For i2 = 65 To 66: For i3 = 65 To 66: For i4 = 65 To 66
For i5 = 65 To 66: For i6 = 65 To 66: For n = 32 To 126
ActiveSheet.Unprotect Chr(i) & Chr(j) & Chr(k) & _
Chr(l) & Chr(m) & Chr(i1) & Chr(i2) & Chr(i3) & _
Chr(i4) & Chr(i5) & Chr(i6) & Chr(n)
If ActiveSheet.ProtectContents = False Then
MsgBox "One usable password is " & Chr(i) & Chr(j) & _
Chr(k) & Chr(l) & Chr(m) & Chr(i1) & Chr(i2) & _
Chr(i3) & Chr(i4) & Chr(i5) & Chr(i6) & Chr(n)
Exit Sub
End If
Next: Next: Next: Next: Next: Next
Next: Next: Next: Next: Next: Next
End Sub
Sorce
http://uknowit.uwgb.edu/page.php?id=28850
Copy and paste the following. When Done press F5 to Run code. The sheet is unprotected now.
Sub PasswordBreaker()
'Breaks worksheet password protection.
Dim i As Integer, j As Integer, k As Integer
Dim l As Integer, m As Integer, n As Integer
Dim i1 As Integer, i2 As Integer, i3 As Integer
Dim i4 As Integer, i5 As Integer, i6 As Integer
On Error Resume Next
For i = 65 To 66: For j = 65 To 66: For k = 65 To 66
For l = 65 To 66: For m = 65 To 66: For i1 = 65 To 66
For i2 = 65 To 66: For i3 = 65 To 66: For i4 = 65 To 66
For i5 = 65 To 66: For i6 = 65 To 66: For n = 32 To 126
ActiveSheet.Unprotect Chr(i) & Chr(j) & Chr(k) & _
Chr(l) & Chr(m) & Chr(i1) & Chr(i2) & Chr(i3) & _
Chr(i4) & Chr(i5) & Chr(i6) & Chr(n)
If ActiveSheet.ProtectContents = False Then
MsgBox "One usable password is " & Chr(i) & Chr(j) & _
Chr(k) & Chr(l) & Chr(m) & Chr(i1) & Chr(i2) & _
Chr(i3) & Chr(i4) & Chr(i5) & Chr(i6) & Chr(n)
Exit Sub
End If
Next: Next: Next: Next: Next: Next
Next: Next: Next: Next: Next: Next
End Sub
Sorce
http://uknowit.uwgb.edu/page.php?id=28850
Thursday, September 04, 2014
Unable to print or view the print preview of a webpage in Internet Explorer
The problem prints a blank page with a footer displaying the following line: “file:///C:/Users/userprofile/AppData/Local/Temp/Low/randomfilename.htm”.
You maybe missing the "Low" folder. Verify that is is there, if not re-create it.
1. Close all open IE windows.
2. Click on Start and then type in %temp% in the search box and click on the Temp folder in the list.
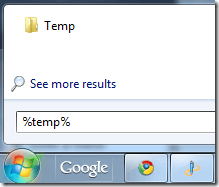
3. Now create a new folder called Low.
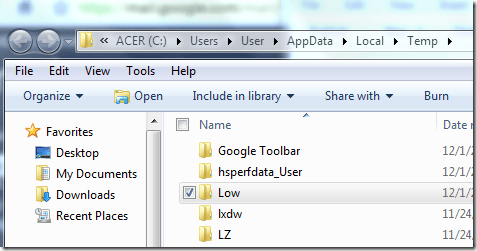
4. Once you’ve created the Low folder, close Explorer, re-start IE and try to print the web page again.
Alternatively you can use Microsoft's Fix it
 Fix this problem
Microsoft Fix it 50676
Source
http://support.microsoft.com/kb/973479
http://www.datacorps.com/2012/how-to-fix-internet-explorer-printing-blank-pages/
You maybe missing the "Low" folder. Verify that is is there, if not re-create it.
1. Close all open IE windows.
2. Click on Start and then type in %temp% in the search box and click on the Temp folder in the list.

3. Now create a new folder called Low.

4. Once you’ve created the Low folder, close Explorer, re-start IE and try to print the web page again.
Alternatively you can use Microsoft's Fix it
Fix this problemMicrosoft Fix it 50676
Source
http://support.microsoft.com/kb/973479
http://www.datacorps.com/2012/how-to-fix-internet-explorer-printing-blank-pages/
Saturday, August 30, 2014
HP & VMware Links
Nice page as of 8/30/2014 with HP & VMware related links.
http://www.v-front.de/p/hp-vmware-links.html
Some notable info
General links
- VMware from HP - ProLiant Server VMware Support Matrix
- HP Service Pack for ProLiant (latest version)
(bootable ISO for firmware updates with HP Smart Update Manager) - HP Maintenance Supplement Bundle for SPP 2014.02.0(B)
- Current VMware FW and Software Recipe (Compatibility Matrix)
- HP ProLiant Offline Array Configuration Utility 9.40.12.0 (19 Feb 2013) [alternate link]
- HP Systems Insight Manager (HP SIM)
(for monitoring HP hardware health incl. alerting) - HP Insight Control (incl. Insight Control for VMware vCenter Server)
(integrates HP SIM into vSphere client)
HP Online Depot for ESXi 5.x
- For usage with VMware Update Manager and Image Builder: http://vibsdepot.hp.com
- Download HP drivers and bundles for ESXi 5.x from http://vibsdepot.hp.com/hpq/. (Change to the latest subdirectory e.g. feb2014 or mar2014-550)
Monday, August 25, 2014
VMware template for Windows Server 2008 R2
Great step by step for making a VM template
http://sjpl.org/blog/vmware-template-windows-server-2008-r2
http://sjpl.org/blog/vmware-template-windows-server-2008-r2
Friday, June 06, 2014
All mailboxes in an Exchange database are disconnected and/or your account has been disabled in OWA
This was for an issue which occurred on Exchange 2010 sp3 rollup 5.
Email flow had been working for years. All of a sudden email flow stopped. Email server was restarted and email flow worked only for mailboxes located in one specific Exchange database. Mailboxes located in the other Exchange databases didn't have total email flow. Mailboxes of affected users were unable to open Outlook.
When a working mailbox sent an internal email to an affected mailbox they would receive an undeliverable bounce back with the following message:
"Delivery has failed to these recipients or groups". "There's a problem with the recipient's mailbox. Please try resending this message. If the problem continues, please contact your helpdesk."
OWA was up but any mailbox in an affected database would receive a message "Your account has been disabled". Among some of the details of the error message was:
Exception type: Microsoft.Exchange.Data.Storage.AccountDisabledException
Exception message: Cannot open mailbox
The issue stems from an Active Directory issue which caused the Exchange server to either get out of synch or to be caching information and not updating. Below is how the issue was resolved.
Steps summary:
1. Try to reconnect disconnected mailboxes.
2. Check DNS server Exchange is using. (Note that this might not be a necessary step but it was part of resolution)
3. Clean Exchange database.
4. Fix any mailboxes stuck in Disconnect Mailbox folder.
Steps detail:
1. Try to reconnect disconnected mailboxes.
In Exchange Management Console (EMC) navigate to Microsoft Exchange -> Microsoft Exchange On-Premises -> Disconnected Mailbox.
Right click Connect.
Choose matching user.
Click OK.
2. Check DNS server Exchange is using
In Exchange Management Console (EMC) navigate to Microsoft Exchange -> Microsoft Exchange On-Premises -> Organization Configuration.
Right click and select "Modify Configuration Domain Controller"
Select Specify a domain controller
Domain = the domain the Exchange server resides on.
Configuration domain controller = make note of current selection and then choose a secondary domain controller.
Click OK.
Repeat above steps but this time Configuration domain controller = the original or primary domain controller.
Click OK
3. Clean Exchange database
In Exchange Management Shell (EMS) run the following cmdlet
Get-Mailboxdatabase
Make note of any database listed under Name column
Now run the following cmdlet. Replace the "DBNAME" with the database name from above. Run the cmdlet on each database.
Get-Mailboxdatabase –Identity “DBNAME” | Clean-Mailboxdatabase
4. Fix any mailboxes stuck in Disconnect Mailbox folder
In Exchange Management Console (EMC) navigate to Microsoft Exchange -> Microsoft Exchange On-Premises -> Disconnected Mailbox.
Click Refresh.
If any mailbox is still listed, right click and select Connect.
Choose matching user.
Click OK.
Bonus step that was not performed but might be necessary.
If mailbox does not appear after replication, Run Get-Mailboxdatabase | Clean-Mailboxdatabase.
References
http://exchangeexpertscommunity.blogspot.com/2013/07/your-account-has-been-disabled-error.html
http://social.technet.microsoft.com/Forums/exchange/en-US/b8c55f32-eebb-4c85-80b4-03b40d53db1d/exchange-2010-sp2-owa?forum=exchangesvrclientslegacy
Email flow had been working for years. All of a sudden email flow stopped. Email server was restarted and email flow worked only for mailboxes located in one specific Exchange database. Mailboxes located in the other Exchange databases didn't have total email flow. Mailboxes of affected users were unable to open Outlook.
When a working mailbox sent an internal email to an affected mailbox they would receive an undeliverable bounce back with the following message:
"Delivery has failed to these recipients or groups". "There's a problem with the recipient's mailbox. Please try resending this message. If the problem continues, please contact your helpdesk."
OWA was up but any mailbox in an affected database would receive a message "Your account has been disabled". Among some of the details of the error message was:
Exception type: Microsoft.Exchange.Data.Storage.AccountDisabledException
Exception message: Cannot open mailbox
The issue stems from an Active Directory issue which caused the Exchange server to either get out of synch or to be caching information and not updating. Below is how the issue was resolved.
Steps summary:
1. Try to reconnect disconnected mailboxes.
2. Check DNS server Exchange is using. (Note that this might not be a necessary step but it was part of resolution)
3. Clean Exchange database.
4. Fix any mailboxes stuck in Disconnect Mailbox folder.
Steps detail:
1. Try to reconnect disconnected mailboxes.
In Exchange Management Console (EMC) navigate to Microsoft Exchange -> Microsoft Exchange On-Premises -> Disconnected Mailbox.
Right click Connect.
Choose matching user.
Click OK.
2. Check DNS server Exchange is using
In Exchange Management Console (EMC) navigate to Microsoft Exchange -> Microsoft Exchange On-Premises -> Organization Configuration.
Right click and select "Modify Configuration Domain Controller"
Select Specify a domain controller
Domain = the domain the Exchange server resides on.
Configuration domain controller = make note of current selection and then choose a secondary domain controller.
Click OK.
Repeat above steps but this time Configuration domain controller = the original or primary domain controller.
Click OK
3. Clean Exchange database
In Exchange Management Shell (EMS) run the following cmdlet
Get-Mailboxdatabase
Make note of any database listed under Name column
Now run the following cmdlet. Replace the "DBNAME" with the database name from above. Run the cmdlet on each database.
Get-Mailboxdatabase –Identity “DBNAME” | Clean-Mailboxdatabase
4. Fix any mailboxes stuck in Disconnect Mailbox folder
In Exchange Management Console (EMC) navigate to Microsoft Exchange -> Microsoft Exchange On-Premises -> Disconnected Mailbox.
Click Refresh.
If any mailbox is still listed, right click and select Connect.
Choose matching user.
Click OK.
Bonus step that was not performed but might be necessary.
If mailbox does not appear after replication, Run Get-Mailboxdatabase | Clean-Mailboxdatabase.
References
http://exchangeexpertscommunity.blogspot.com/2013/07/your-account-has-been-disabled-error.html
http://social.technet.microsoft.com/Forums/exchange/en-US/b8c55f32-eebb-4c85-80b4-03b40d53db1d/exchange-2010-sp2-owa?forum=exchangesvrclientslegacy
Friday, May 30, 2014
Network printer won't print even though it is online
If a network printer won't print even though it is online. A driver may have become corrupted. Try the following steps to resolve:
- Run printui.exe /s /t2
- Highlight unnecessary/old printers and click Remove
- Select Remove driver and driver package and click OK
- Repeat above steps and perform the same for the network printer having issue
- Stop Print Spooler and repeat above step for network printer
- Open Registry (regedit) and navigate to HKEY_LOCAL_MACHINE\SYSTEM\CurrentControlSet\Control\Print\Environments\Windows x64\Drivers\Version-3
- Highlight network printer and press delete entry
- Start Print Spooler
- Re-install network printer driver
Wednesday, May 28, 2014
How to remove/delete old updates on WSUS server
This How-To is designed to show you how to most effectively clean your WSUS server of old, depreciated or superceded updates. This how-to assumes that you have already selected the correct update classifications, products, and languages for your environment. If you still need to do that, see this How-To here: http://community.spiceworks.com/how_to/show/2572
| 1. | Open the Windows Update Services MMC |  |
|---|---|---|
| 2. | Select the All Updates ViewSet the display to show the Approval status of 'Any except Declined' with a Status of 'Any'. Click Refresh. |  |
| 3. | Display the Supercedence ColumnRight-click the column headers and select Supercedence. |  |
| 4. | Sort by SupercedenceLeft-click on the Supercedece Column. | |
| 5. | Select and Decline the Superceded UpdatesThe updates to be declined have one of two particular flowchart symbols for their updates pictured in the attached image. Select the correct updates and Decline them by either right-clicking the selected updates and clicking decline or by pressing the decline button in the action pane. |  |
| 6. | Run the Server Cleanup WizardMake sure you have all options selected in the wizard and let it run. It will delete the files from the declined updates. |  |
| 7. | OPTIONAL: Automatic Approval OptionsIn the automatic approval options, under the advanced tab, there is an option to automatically approve update revisions for previously approved updates and subsequentially decline the now expired updates. I suggest you select them. |  |
Source
http://community.spiceworks.com/how_to/show/2563-clean-your-wsus-server
Monday, February 03, 2014
Steps to updating Sonicwall firmware
Connect the computer to the x0 interface.
1- Get a paper clip and push and hold for 15 seconds on
the reset button *wait till the wrench light starts to flash.
2- Go to your local nic settings in your computer
(start>run>ncpa.cpl) IP 192.168.168.25 (anything except for 168) Subnet
mask is 255.255.255.0 Default gateway will be 192.168.168.168
3- The wait about a minute and then open a browser and go
to 192.168.168.168 Go into the Sonicwall boot options and choose firmware (?)
with factory defaults.
4- Once it restarts, go to the Sonicwall and log in
Default username is admin Password is password.
5- Go to system>settings import settings.
6- Then remove the static ip from your computer and set
it to dynamic if that is its original configuration
7- Register your firewall with your mysonicwall.com
account.
Recommended Sonicwall Global VPN Client
As of 2/3/2014
For Windows 7: 4.6.4.0114
For Windows 8: 4.7.3.0403
They can be downloaded here
https://www.mysonicwall.com/firmware/previousversions.aspx?CF=14&SG=5317&PG=FD&LC=EN
For Windows 7: 4.6.4.0114
For Windows 8: 4.7.3.0403
They can be downloaded here
https://www.mysonicwall.com/firmware/previousversions.aspx?CF=14&SG=5317&PG=FD&LC=EN
Saturday, February 01, 2014
How to monitor Sonicwall for FTP traffic
On Sonicwall, navigate to System->Packet Monitor
Click Clear
Click Configure
On the Monitor Filter tab
Ether Types: IP
IP Types: UDP, TCP, ICMP
Destination IP Address: (public IP of FTP server)
Check "Enable Bidirectional Address and Port Matching
On Advanced Filter tab
Check all boxes
Click OK
Click Start Capture
Click Stop Catpure when done captureing
Click Clear
Click Configure
On the Monitor Filter tab
Ether Types: IP
IP Types: UDP, TCP, ICMP
Destination IP Address: (public IP of FTP server)
Check "Enable Bidirectional Address and Port Matching
On Advanced Filter tab
Check all boxes
Click OK
Click Start Capture
Click Stop Catpure when done captureing
Monday, January 13, 2014
How to allow a specific public IP through Windows Firewall
Navigate to Start->Administrative Tools->Windows Firewall with
Advanced Security
In left navigation left click Inbound Rules
In the Right navigation left click New Rule…
Click Custom and Next
Click All programs and Next
Select Protocol Type and ports or choose Any and All
Click Next
In Which remote IP addresses does this rule apply to
click “These IP addresses” and click Add…
Enter public IP and click OK
Click Next
Click Allow the connection and Next
Choose when rule applies and Next
Give the rule a name and description. Click Next.
Click Finish.
You can also add a rule from the command line. The below example adds a rule to allow Remote
Desktop services from public IP 209.172.32.36 with the rule name of
RDesktopRule.
netsh advfirewall firewall add rule name="RDesktopRule"
action=allow remoteip=209.172.32.36 protocol=TCP dir=in localport=3389
Sources
http://terenceluk.blogspot.com/2013/09/enabling-tls-for-exchange-server-2010.html
http://www.rackspace.com/knowledge_center/article/creating-an-inbound-custom-allow-rule-for-windows-firewall-windows-2008
http://www.rackspace.com/knowledge_center/article/creating-an-inbound-custom-allow-rule-for-windows-firewall-windows-2008
Tuesday, October 08, 2013
Unable to remove or disconnect network drive
When trying to disconnect a network drive the following error message is presented
“This network connection does not exist"
or
"Z:\ refers to a location that is unavailable. It could be on a hard drive on this computer, or on a network. Check to make sure that the disk is properly inserted, or that you are connected to the Internet or your network, and then try again. If it still cannot be located, the information might have been moved to a different location.”
Perform the following steps to correct:
Run->Start
Regedit
Navigate to
HKEY_CURRENT_USER\Software\Microsoft\Windows\CurrentVersion\Explorer\MountPoints
In this folder, delete anything with ## in front of it.
Run Task Manager
On Processes tab, highlight Explorer and click End Process
File->New Task (Run…) and type
Explorer
Below is a possible script to automatically fix the registry. Save the following as .vbs
identify subkeys with "##" and remove them
const HKEY_CURRENT_USER = &H80000001
strComputer = "."
Set oReg=GetObject("winmgmts:{impersonationLevel=impersonate}!\\" &_
strComputer & "\root\default:StdRegProv")
strKeyPath = "Software\Microsoft\Windows\CurrentVersion\Explorer\MountPoints2"
oReg.EnumKey HKEY_CURRENT_USER, strKeyPath, arrSubKeys
For Each subkey In arrSubKeys
If CBool(Instr(subkey,"##")) Then
oReg.DeleteKey HKEY_CURRENT_USER, strKeyPath&"\"&subkey
End If
Next
Saturday, July 27, 2013
Using the One-Touch DPI and Stateful Firewall high security applies the following configurations to the system. A system restart is then required for the updates to take full effect.
System>Administration
- Password must be changed every 90 days
- Bar repeated password changes for 4 changes
- Enforce password complexity: Require alphabetic, numeric and symbolic characters
- Apply the above password constraints for: all user categories
- Enable administrator/user lockout
- Failed Login attempts per minute before lockout: 7
- Enable inter-administrator messaging
- Inter-administrator Messaging polling interval (seconds): 10
Network>Interfaces
- Any interface allowing HTTP management is replaced with HTTPS Management
- Any setting to 'Add rule to enable redirect from HTTP to HTTPS' is disabled
- Ping Management is disabled on all interfaces
Network>Zones
- Intrusion Prevention is enabled on all applicable default Zones
- Gateway Anti-Virus protection is enabled on all applicable default Zones
- Anti-Spyware protection is enabled on all applicable default Zones
- App Rules is enabled on all applicable default Zones
- SSL Control is enabled on all default Zones
Network>DNS
- Enable DNS Rebinding protection
- DNS Rebinding Action: Log Attack & Drop DNS Reply
Firewall>Access Rules
- Any Firewall policy with an Action of Deny, the Action is changed Discard
- Source IP Address connection limiting with a threshold of 128 connections is enabled for all firewall policies
Firewall>App Rules
- If licensed, the Enable App Rules setting is turned on
Firewall Settings>Advanced
- Turn on Enable Stealth Mode
- Turn on Randomize IP ID
- Turn off Decrement IP TTL for forwarded traffic
- Connections are set to: DPI Connections (DPI services enabled with additional performance optimizations)
- Turn on Enable IP header checksum enforcement
- Turn on Enable UDP checksum enforcement
Firewall Settings>Flood Protection
- Turn on Enforce strict TCP compliance with RFC 793 and RFC 1122
- Turn on Enable TCP handshake enforcement
- Turn on Enable TCP checksum enforcement
- Turn on Enable TCP handshake timeout
- SYN Flood Protection Mode: Always proxy WAN client connections
Firewall Settings>SSL Control
- Turn on Enable SSL Control
- Set Action to: Block connection and log the event
- For Configuration, enable all categories
VPN>Advanced
- Turn on Enable IKE Dead Peer Detection
- Turn on Enable Dead Peer Detection for Idle VPN sessions
- Turn on Enable Fragmented Packet Handling
- Turn on Ignore DF (Dont Fragment) Bit
- Turn on Enable NAT Traversal
- Turn on Clean up Active tunnels when Peer Gateway DNS name resolves to a different address
- Turn on Preserve IKE port for Pass Through Connections
Security Services>Gateway Anti-Virus
- If licensed, Enable Gateway Antivirus
- Configure Gateway AV Settings: Turn on Disable SMTP Responses
- Configure Gateway AV Settings: Turn off Disable detection of EICAR test virus
- Configure Gateway AV Settings: Turn on Enable HTTP Byte-Range requests with Gateway AV
- Configure Gateway AV Settings: Turn on Enable FTP REST request with Gateway AV
- Configure Gateway AV Settings: Turn off Enable HTTP Clientless Notification Alerts
Security Services>Intrusion Prevention
- If licensed, Enable IPS
- Turn on Prevent All and Detect All for High Priority Attacks
- Turn on Prevent All and Detect All for Medium Priority Attacks
- Turn on Prevent All and Detect All for Low Priority Attacks
Security Services>Anti-Spyware
- If licensed, Enable Anti-Spyware
- Turn on Prevent All and Detect All for High Priority Attacks
- Turn on Prevent All and Detect All for Medium Priority Attacks
- Turn on Prevent All and Detect All for Low Priority Attacks
- Configure Anti-Spyware Settings: Turn on Disable SMTP Responses
- Configure Anti-Spyware Settings: Turn off Enable HTTP Clientless Notification Alerts
AppFlow>Flow Reporting
- Turn on Send AppFlow To Local Collector
- Turn on Enable Real-Time Data Collection
Log>Log Monitor
- Set Logging Level: Debug
Log>Name Resolution
- Set Name Resolution Method to: DNS then NetBIOS
Internal Settings
- Turn on Protect against TCP State Manipulation DoS
- Turn on Apply IPS Signatures Bidirectionally
- Allow launching of AppFlow Monitor in a stand-alone browser frame
- Enable Visualization UI for Non-Admin/Config users
Source
http://www.sonicwall-sales.com/help-and-advice/sonicwall-one-touch-configuration.html
Thursday, July 18, 2013
Configuring Two Sonicwalls To Use Layer 2 Connection with Failover
This is a summery of how you can connect a layer 2 (point to point/direct connection) between two Sonicwalls using SonicOS Enhanced 5.8. This is also a summery of how you can use the second Sonicwall’s WAN as a failover connection for the first Sonicwall.
On the first Sonicwall, plug layer 2 connection into an interface. For this example we will use X5.
Network->Interfaces
Zone: WAN
IP Assignment: Static
IP Address: 10.10.10.1
Subnetmask: 255.255.255.0
Default Gateway: 10.10.10.2
DNS Server 1: 208.67.222.222
DNS Server 2: 8.8.8.8
DNS Server 3: 208.67.222.220
On the second Sonicwall, plug layer 2 connection into an interface. For this example we will use X5.
Network->Interfaces
Zone: LAN
Mode/P Assignment: Static IP Mode
IP Assignment: 10.10.10.2
Subnetmask: 255.255.255.0
For failover and the ability to use the second Sonicwall's WAN for the first Sonicwall's WAN...
On the first Sonicwall
Network->Failover & LB
Check Enable Load Balancing
Check Respond to Probes
In the Groups section Click Configure for Default LB
Type: Basic Failover
Check Preemp failback to preferred interfaces when possible
Highlight X5 interface and click Add
Order desired interface and click OK
Click Configure for X5
Select Logical/Probe Monitoring enabled
Select Probe succeeds when either Main Target or Alternate Target responds
Main Target: Ping (ICMP) Host: 4.2.2.1
Alternate Target: Ping (ICMP) Host: 8.8.8.8
Default Target IP: 208.67.222.222
Click OK
Click Accept
Subscribe to:
Posts (Atom)