Pages

Tuesday, February 07, 2012

Hard Reset - Galaxy Nexus by Samsung

Hard Reset - Galaxy Nexus by Samsung

Warning Performing a hard reset will remove ALL data including the Google account, system data, application data, application settings, and downloaded applications. Only perform this reset if absolutely necessary.

Warning Pictures, Videos and Music will also be removed. It is recommended to backup this data unless willing to lose it.

Note Personal data such as WiFi passwords, Browser bookmarks, User dictionary, a list of installed Market applications and other customized settings can be backed up to and restored from Google's servers.

Preferred method
Alternate method

Preferred method

  1. From the home screen, select Apps.
    Home screen with Apps
  2. From the APPS tab, select Settings.
    Apps with Settings
  3. From the PERSONAL section, select Backup & reset.
    Settings with Backup & reset
  4. From the PERSONAL DATA section, select Factory data reset.
    Backup & reset with Factory data reset
  5. Select Reset phone.
    Note If presented, enter the current passcode or draw the unlock pattern.
    Reset phone
  6. Select Erase everything.
    Note Allow several minutes for the factory data reset and reboot processes to complete.
    Erase everything
  7. Refer to Initial Activation and Setup.

Top

Alternate method

  1. Press and hold the Power button.
    Power button
  2. Select Power off.
    Phone Options with Power off
  3. Select OK.
    Power off with OK
  4. Press and hold the Volume keys+Power button simultaneously until bootloader mode (image of an Android with Start) appears then release.
    Volume keys and Power button
  5. Select Recovery mode.
    Note Utilize the volume keys to cycle through the available options and the Power button to select.
    Note The device will restart in Recovery mode.
    Bootloader screen with Recovery mode
  6. From the Recovery mode screen, press and hold the Power button then press the Volume up (+) key.
    Recovery mode screen
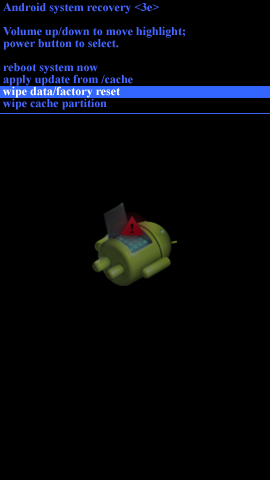
  7. Select wipe data/factory reset.
    Recovery mode screen with wipe data/factory reset
  8. Select Yes -- delete all user data.
    Note Allow several minutes for the factory data reset process to complete.
    Recovery mode screen with Yes -- delete all user data
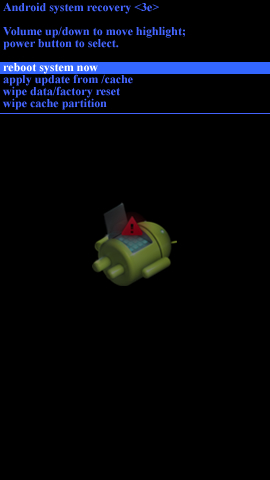
  9. Select reboot system now.
    Note Allow several minutes for the reboot process to complete.
    Recovery mode screen with reboot system now
  10. Refer to Initial Activation and Setup.

How to Install ICS on Droid X

Download files either using phone browser or to computer and transfer to sdcard
EncoutnerICSx Beta 3 http://www.multiupload.com/6J90T9DW50
Gapps: http://tux-head.net/...p/gappsv5.1.zip
 

Root Phone (http://www.androidauthority.com/how-to-root-droid-x-running-android-2-3-gingerbread-39804/)

Install ClockworkMod

from Rom Manager
Flash ClockworkMod Recovery
  Reeat
Reboot into Recovery

from clockworkmod recovery
wipe data/factory reset
  yes
wipe cache partition
  yes

advanced
  wipe Dalvik Cache
   yes

back out (power button)

install zip from sdcard
  choose zip from sdcard
   highlight EncoutnerICSx Beta 3 zip and click camera button
    yes
install zip from sdcard
  choose zip from sdcard
   highlight Gapps zip and click camera button
    yes

back out (power button)
 
reboot system now

http://www.androidauthority.com/how-to-install-ice-cream-sandwich-rom-on-motorola-droid-x-40674/

http://forum.xda-developers.com/wiki/index.php?title=Bloatware

Monday, February 06, 2012

How to Boot into Recovery on the DROID X

1. Turn your phone off.
2. Hold down “Home” and press “Power” until the Motorola logo appears.
3. Release ”Power” and continue to hold “Home” until an exclamation appears.
4. Release “Home” and press the “Volume Up” and “Volume Down” at the same time button once.
5. Your phone will now enter recovery.
6. Use the "Power" button to select.

Friday, January 27, 2012

How to Configure a Relay Connector for Exchange Server 2010

In most Exchange Server 2010 environments there will be the need to allow relaying for certain hosts, devices or applications to send email via the Exchange server. This is common with multi-function devices such as network attached printer/scanners, or applications such as backup software that send email reports.

SMTP communication is handled by the Hub Transport server in an Exchange organization. The transport service listens for SMTP connections on it’s default Receive Connector. However, this connector is secured by default to not allow anonymous connections (ie, the type of connection most non-Exchange systems will be making).

You can see this in effect if you telnet to the server on port 25 and try to initiate unauthenticated SMTP communications.

220 EX3.exchangeserverpro.local Microsoft ESMTP MAIL Service ready at Wed, 18 Au
g 2010 19:42:27 +1000
helo
250 EX3.exchangeserverpro.local Hello [192.168.0.9]
mail from: somebody@hotmail.com
530 5.7.1 Client was not authenticated

For some Hub Transport servers that are internet-facing, anonymous connections may already be enabled. In those cases relay would still be denied but will behave differently than the first example.

220 EX3.exchangeserverpro.local Microsoft ESMTP MAIL Service ready at Wed, 18 Au
g 2010 20:01:44 +1000
helo
250 EX3.exchangeserverpro.local Hello [192.168.0.9]
mail from: somebody@hotmail.com
250 2.1.0 Sender OK
rcpt to: somebody@gmail.com
550 5.7.1 Unable to relay

You’ll note that relay is denied if I try to send from an @hotmail.com address to an @gmail.com address, because neither is a valid domain for the Exchange organization. But with Anonymous Users enabled on the Receive Connector I can send from an @hotmail.com address to a valid local address.

220 EX3.exchangeserverpro.local Microsoft ESMTP MAIL Service ready at Wed, 18 Au
g 2010 20:05:54 +1000
helo
250 EX3.exchangeserverpro.local Hello [192.168.0.9]
mail from: somebody@hotmail.com
250 2.1.0 Sender OK
rcpt to: alan.reid@exchangeserverpro.local
250 2.1.5 Recipient OK
data
354 Start mail input; end with .
test
.
250 2.6.0 [In
ternalId=2] Queued mail for delivery

However if I try to relay out to an external recipient, the Exchange server does not allow it.

220 EX3.exchangeserverpro.local Microsoft ESMTP MAIL Service ready at Wed, 18 Au
g 2010 20:11:27 +1000
helo
250 EX3.exchangeserverpro.local Hello [192.168.0.9]
mail from: backups@exchangeserverpro.net
250 2.1.0 Sender OK
rcpt to: alerts@managedserviceprovider.com
550 5.7.1 Unable to relay

To permit a non-Exchange server to relay mail we can create a new Receive Connector on the Hub Transport server. Launch the Exchange Management Console and navigate to Server Management, and then Hub Transport. Select the Hub Transport server you wish to create the new Receive Connector on, and from the Actions pane of the console choose New Receive Connector.


Give the new connector a name such as “Relay ” and click Next to continue.


You can leave the local network settings as is, or optionally you can use a dedicated IP address for this connector if one has already been allocated to the server. Using dedicated IP addresses for each connector is sometimes required if you need to create connectors with different authentication settings, but for a general relay connector it is not necessary to change it.


Highlight the default IP range in the remote network settings and click the red X to delete it.


Now click the Add button and enter the IP address of the server you want to allow to relay through the Exchange server. Click OK to add it and then Next to continue.


Click the New button to complete the wizard.

The Receive Connector has now been created but is not yet ready to allow the server to relay through it. Go back to the Exchange Management Console, right-click the newly created Receive Connector and choose properties.

Select the Permission Groups tab and tick the Exchange Servers box.


Select the Authentication Tab and tick the Externally Secured box.


Apply the changes and the Receive Connector is now ready for the server to relay through.

220 EX3.exchangeserverpro.local Microsoft ESMTP MAIL Service ready at Wed, 18 Au
g 2010 20:31:00 +1000
helo
250 EX3.exchangeserverpro.local Hello [192.168.0.9]
mail from: backups@exchangeserverpro.net
250 2.1.0 Sender OK
rcpt to: alerts@managedserviceprovider.com
250 2.1.5 Recipient OK
data
354 Start mail input; end with .
test
.
250 2.6.0 <924bab1e-0f07-4054-8700-d121577993b4@EX3.exchangeserverpro.local> [In
ternalId=3] Queued mail for delivery

Because the remote IP range has been secured to that single IP address, any other servers on different IP addresses still won’t be able to relay through the Exchange Server. From any other IP address not included in the remote IP range on the Receive Connector relay will be denied.

220 EX3.exchangeserverpro.local Microsoft ESMTP MAIL Service ready at Wed, 18 Au
g 2010 20:46:06 +1000
helo
250 EX3.exchangeserverpro.local Hello [192.168.0.2]
mail from: backups@exchangeserverpro.net
250 2.1.0 Sender OK
rcpt to: alerts@managedserviceprovider.com
550 5.7.1 Unable to relay

You can later add more IP addresses, IP ranges, subnets, or even add multiple IP addresses to the Receive Connector using a script if necessary.

Source


http://exchangeserverpro.com/how-to-configure-a-relay-connector-for-exchange-server-2010

Friday, January 20, 2012

Configuring multiple E-mail domains in exchange 2010

We can configure Microsoft Exchange Server 2010 to accept e-mail for more than one SMTP domains. In this article I will show you how to configure the accepted domains and how to create the new email address policy for the new e-mail domain

Scenarios:-

  • Your Company has different independent business units and the each of them need different e-mail domains; company management doesn’t want to spend money for this.
  • You Providing the email hosting service and have to accept e-mail for more than one SMTP domain name

Prerequisites

  • A public DNS MX resource record is required for each SMTP domain for which you accept e-mail from the Internet. Each MX record should resolve to the Internet-facing server that receives e-mail for your organization.
  • Send and Receive connectors should be configured, so that the Exchange organization can send e-mail to and receive e-mail from the Internet.

There are two steps to configure exchange 2010 to accept e-mail for more than one SMTP domains. The initial step is configuring the accepted domain and the second one is create or modify the email policy.

Use the EMC to configure Exchange 2010 to accept e-mail for more than one domain

Expand the Organization Configuration node, and then click Hub Transport. In the results pane, click the Accepted Domains tab.

In the action pane, click New Accepted Domain, or right-click and select the New Accepted Domain from the Accepted Domains tab. Then the New Accepted Domain wizard appears.

1

Figure: 1

On the New Accepted Domain page, type a name to identify the accepted domain entry. In the Accepted Domain field, type the SMTP domain name. Select Authoritative Domain. E-mail is delivered to a recipient in this Exchange organization.

Click New to create the Accepted Domain.

2

Figure: 2

Now you can see that the Authoritative Accepted Domain shareef.info has been created and listed in the Accepted Domain tab

3

Figure: 3

Now we need to configure the email address policy for the newly created authoritative domain. To do this either we can create new email address policy or edit the existing email address policy. I prefer to create the new email address policy.

To create the new email address policy expand the Organization Configuration node, and then click Hub Transport. In the results pane, click the E-mail Address Policies tab.

In the action pane, click New E-mail Address Policy or right-click and select the New E-Mail Address Policy from the E-mail Address Policies tab.

4

Figure: 4

Type a name for the e-mail address policy in this example its @shareef.info. If the users that will be assigned this new e-mail address policy are all in a specific organizational unit (OU), click Browse to restrict this e-mail address policy to that specific OU. Select an option under Include these recipient types to determine to which recipient types this e-mail address policy will be applied, in this example I choose Users with Exchange Mailbox, you can select this option as per your exchange environment. Click Next.

5

Figure: 5

If you want to specify any condition for this policy specify the same. In this example I prefer not to specify any condition. Click Next to continue.

6

Figure: 6

On the E-mail Addresses page, click Add to specify the domain for the E-mail Address and the E-mail address local part.

7

Figure: 7

In the SMTP E-mail Address dialog box, select the option under E-mail address local part that determines how the recipient’s e-mail address alias will be generated.

Click the Select the accepted domain for the e-mail address option, and then click Browse. In the Select Accepted Domain dialog box, select an accepted domain, in this example its shareef.info and then click OK. Click OK again to close the SMTP E-mail Address dialog box.

8

Figure: 8

Click Next to continue.

9

Figure: 9

In the Schedule page, select an option to specify when the e-mail address policy will be applied and the maximum length of time that the task is permitted to run. I am choosing immediately.

Click Next.

10

Figure: 10

Click New to create the new E-Mail Address Policy

11

Figure: 11

The New E-Mail Address Policy task has been completed successfully. Click Finish to exit the wizard.

12

Figure: 12

In this screenshot you can see the new email address policy has been applied.

14

Figure: 13

PowerShell commands for configuring the Exchange 2010 to accept e-mail for more than one domain

To create the New Authoritative Accepted Domain

New-AcceptedDomain -Name “blog.shareef.info” -DomainName shareef.info -DomainType Authoritative

To create the New E-Mail Address Policy

New-EmailAddressPolicy -Name “@shareef.info” -IncludedRecipients UserMailbox -ConditionalDepartment “Fourth Coffee” -Priority 1 -EnabledEmailAddressTemplates “SMTP:@fourthcoffee.com”

To apply the New E-Mail Address Policy to the recipients

Update-EmailAddressPolicy -Identity “@shareef.info”

Source

http://blog.shareef.info/2010/06/02/configuring-multiple-e-mail-domains-in-exchange-2010/

http://technet.microsoft.com/en-us/library/aa996314.aspx

Configure Exchange 2000/2003 to Receive E-Mail for other Domains

How do I configure my Exchange 2000/2003 server to accept e-mails for domains other than my own?

Exchange 2000/2003 will only accept e-mail traffic for the e-mail domain that is identical to the name of your Active Directory domain. However sometimes we would like to allow our Exchange server to also receive e-mail for domains other than our own, internal domain name.

For example, if you have an AD domain called TEST.HOME and you've installed Exchange 2000/2003 on it, each and every mailbox enabled user, mail enabled user, mail enabled group, mail enabled contact and mail enabled Public Folders you have will automatically have an e-mail address of ALIAS@TEST.HOME.

One day you've decided that you'd like to have an Internet presence, so you bought TEST.COM and you'd like to begin using it on your Exchange server. You don't need to rename your AD domain for that, but you DO need to configure Exchange to receive e-mail for the new domain, along with the traffic you might have had for the old domain name.

This example can also be extended to instances where a company has had it's Internet domain name changed, or when one Exchange server is used to host mailboxes for more than one company.

Basically, Exchange can handle hundreds of mail domains without any problem (up to about 1000 domains), so performance is usually not an issue.

In all of the above examples you'll need to configure Exchange to use new (or modified) Recipient Policies to reflect the change in the e-mail domain names.

Note: You can also configure only a specific range of recipients to receive the new e-mail address. That topic is covered in the Configure Specific E-Mail Addresses for Specific Exchange 2000/2003 Users article.

In order to create a new Recipient Policy please perform the following steps:

  1. Open the Exchange System Manager.
  2. Navigate to the Recipients folder, expand it and go to Recipient Policies. Right-click Default Recipient Policies and choose Properties.

Note: You can also create new Recipient Policies instead on modifying the Default Recipient Policy. You will want to do that in cases when you want to choose specific users or recipients on whom you'd like the new policy to apply. That topic is covered in the Configure Specific E-Mail Addresses for Specific Exchange 2000/2003 Users article.

  1. Click on the E-Mail Address Policy tab. Notice how the default SMTP E-Mail address suffix is exactly the same as your AD Domain. This is where we want to add the new domain.

  1. On the E-Mail Address Policy tab you can add all sorts of e-mail addresses, but the most common one is SMTP of course. Click New, choose SMTP and then configure your Internet E-Mail Domain name (the one you plan to add to all your Exchange recipients - users, groups, contacts and Public Folders).

Remember to add a "@" sign before the new domain name.

You can also select the new e-mail address to be the primary address (i.e. in bold, and it will be used as the e-mail address to where the replies to messages sent by your users will be sent).

Make sure you place a V in the checkbox near the new domain name, otherwise this policy will not make any changes to your recipients.

Note: You can add as many e-mail domain names you want (you should of course OWN them...duh) and the policy will configure them all.

Lamer Note: No, entering "kuku.co.il" is not what YOU'RE supposed to do, this is just an example. You need to BUY your OWN domain name and then have it configured to send e-mail traffic to YOUR server. Read the Configure MX Records for Incoming SMTP E-Mail Traffic article for more info on this topic.

When you're done click Ok.

  1. Read the Exchange System Manager message that pops out and click Ok. Basically, this message tells you that if you plan to make changes to this filter you should then run the Apply Policy Now option.
  1. After you've set your policy, you will now need to apply it. Right-click it and select Apply this Policy Now.

  1. In order to make things happen faster, you'll want to re-run the Recipient Update Service - or RUS - (both of them in most cases, all of them in case you have more than one AD domain). Go to the Recipient Update Service folder and in the right pane right-click all the instances of the RUS you see, and select Update Now.

  1. In order to test the success of the new Recipient Policy, go to one of your recipients and see if the new e-mail address is listed in the recipient's properties.

Done! In cases where the new e-mail address we've just configured is a sub-domain of your current existing domain you'll need to contact your ISP or Name Server provider and ask them to add a sub-domain to your existing domain.

In cases where the new address is for a totally different domain you'll need to configure the MX Records for the new domain. Without performing this step no one will ever know that your server is in fact serving this new domain. Read my Configure MX Records for Incoming SMTP E-Mail Traffic article for more info on this subject.

You can also test to see if your Exchange server is in fact willing to accept messages destined for this new domain. The best methods of testing can be found in the SMTP, POP3 and Telnet in Exchange 2000/2003, Send Mail from Script and Test SMTP Service in IIS and Exchange articles.

Links

You Cannot Deliver Mail to the Local Domain After You Change the Default Recipient Policy - 819421

Source

http://www.petri.co.il/configure_exchange_2000_2003_to_receive_email_for_other_domains.htm

Tuesday, December 06, 2011

How to make Android child-friendly

A good article on how to make an Android child-friendly.

###


Our aim is threefold: to limit app access, to limit phone and internet access and to create an easy to use interface. Ideally we'd also like to control internet access to certain applications and filter web sites, but as you'll see this is complicated by certain limitations.

Restricting apps

For people after a quick and simple "sandbox" there are two fun app options. The first is called Toddler Lock. It's a free, child-friendly lockscreen that interactively draws shapes, patterns and makes happy sounds but otherwise keeps your valuable Android device locked.

Slightly more advanced but just as simple to implement is Famigo Sandbox. This locks down the device and leaves only parent-selected apps available. If you have kids apps already installed it does a good job of automatically spotting these. The interface is colorful, big and fun, locks out the phone and internet and provides a preapproved selection of extra apps to add.

Greater flexibility

If you want a more DIY approach, one that'll provide greater flexibility and can grow with the needs of your child, then we'll show you how to make an Android device child safe in the step-by-step below, providing only the applications you want, a interesting interface to use and even safe internet access, if you so choose.

Going beyond this is down to you. The great thing about Android devices is their access to the Android Market, this instantly provides access to hundreds of thousands of apps, almost 150,000 of which are free.

1. The Go Theme

Make android child friendly

By default Android has tiny icons and text, even for adults, and it's a bit boring to look at. Install Go Launcher EX for free and then the Cartoon Theme. That will pretty things up no end, but everything is still quite small, and as standard there's nothing you can do about this. Try installing Bigger Icons Widget, which helps a lot. If you have Root access then using LCDDensity to increase the DPI will increase the size of everything to kiddie levels.

Make android child friendly

2. Lock down

Make android child friendly

Our main worry is to block access to all apps that we don't specify. As a matter of course you should fire up Android Market, press menu and select Settings. Make sure you enable Content filtering and add a PIN for purchases. Next grab App Lock - it's free and will PIN protect all the apps that you want it to.

3. Setting profiles

Make android child friendly

With all of the apps locked down it's now time to do the same for internet and phone access. You could just go into Settings, disable the networks and wireless, but there's no guarantee things won't get turned back on by accident. We suggest Setting Profiles Lite, which offers a way of configuring a host of settings including data connections, sounds and notifications from a single place.

4. Profile shot

Make android child friendly

Setting Profiles Lite only offers a single profile but that's enough. Tap Menu and New profile. Once you've given it a name you're able to control the wireless, data and volume settings amongst other things. With that created make a rule about when those restrictions should apply, all day is one and you can activate the profile via the status menu.

5. Safe browsing

Make android child friendly

At this point you should have a good looking and a safe Android environment to leave your children playing around in. The Android Market is locked off, the internet is locked and so are any mobile connections. If you do want to allow internet browsing the bad news is that options are limited for site filtering but Safe Browser at least provides white and blacklists and access to filth-free sites.

6. Firewall and more

Make android child friendly

Unfortunately there is no comprehensive website filter or blocking tool. We'd have liked a blanket ban and a system to white list only our chosen sites. If you know one let us know. You can implement filtering via Wi-Fi routers and Android does have firewalls but these tend to only work on rooted devices, such as the flexible DroidWall.

Source

http://www.techradar.com/news/mobile-computing/tablets/how-to-make-android-child-friendly-1045708

Monday, November 21, 2011

Tips & Tricks: BlackBerry Enterprise Activation on a BIS Data Plan

With the onslaught of new devices and device changes, there’s sometimes a need to activate your device on a Blackberry Enterprise Server Express.  With new devices, BES IT policies, software upgrades, difficulties explaining to users how to download from appworld, software compatibility issues occur (as a good friend of mine recently mentioned in his article) and one looks like a star when they have an alternate method to do this.  The point of this article is one such method.

On many carriers, when your Blackberry Device is on a BIS plan, the Enterprise Activation menu item is removed as an available feature. This is generally done by the change or  removal to the service books on the device with it’s interaction with the carrier’s network.

Now for the fun stuff!

In order to get a BIS data plan Blackberry activated on a BES Express, when the menu item does not show on the device one needs to delete the device’s service books, reboot and activate.   I enjoy creating these Step-by-Step’s, so I’ve written this article accordingly.

Step 1: From the main screen of your device scroll up and select the connections bar, or scroll down in your icons to connections.

Step 2: Turn off your wireless by removing the check marks from Mobile Network and Wi-Fi.

Step 3: Escape to the main screen and type Service Books, or depending on the OS version, scroll down and click on Options.

Step 4: In options (or Options and Advanced), select the Service Book icon/menu list.

Step 5: Inside Service Books, highlight each one and either press the delete key, or as listed in the next screen shot, click the menu key and select delete. This needs to be done for each service book, with the exception of the Provisioning, which will not delete. When you see the above, select delete. Once completed, please reboot the blackberry.

Step 6: Once the blackberry is completed, go to the options menu for Enterprise Activation. Either use the search to find it, or options, advanced and enterprise activation, depending on your OS version.

Step 7: Once you have the Enterprise Activation selection, click on it.

Step 8: Inside Enterprise Activation, enter in your email address and password and click activate

(Side Step)  If this is a new to you device and you see the above message, please select yes, so that it can clear the device and start a fresh activation. If the device revives from reboot and the Enterprise activation option is no longer listed, please start the process again at Step 1.

Step 9: When you receive a prompt to enable the radio, please do so and be patient for the process to complete.

Source

http://www.berryreview.com/2011/08/18/tips-tricks-blackberry-enterprise-activation-on-a-bis-data-plan/

Tuesday, November 08, 2011

Attachments remain in the Outlook Secure Temporary File folder when you exit Outlook 2010 or Outlook 2007


You exit Microsoft Office Outlook 2010 or Microsoft Office Outlook 2007 while email attachments are open. These attachments are from email messages that are in a secure Outlook folder.

Alternatively, Outlook unexpectedly closes. When this occurs, the attachments remain in the "Outlook Secure Temporary File" folder. This occurs even if you close the attachments after you exit Outlook.  Additionally, if you open the attachment to the email message from the Preview pane, you do not receive a prompt to save changes when you exit Outlook.

This problem occurs because Outlook 2010 and Outlook 2007 cannot remove the temporary file or dispose of the secure temporary folder while the attachments are open.

When you open file attachments that are considered safe, Outlook 2010 and Outlook 2007 puts these attachments in a subdirectory of the Temporary Internet Files directory as an additional precaution. When Outlook 2010 or Outlook 2007 first tries to use a temporary file, it examines the registry to determine whether the following value exists, depending on your version of Outlook.

Outlook 2010

HKEY_CURRENT_USER\Software\Microsoft\Office\14.0\Outlook\Security

or

HKEY_CURRENT_USER\Software\Policies\Microsoft\Office\14.0\Outlook\Security

Value Name: OutlookSecureTempFolder
Data Type: REG_SZ

Outlook 2007

HKEY_CURRENT_USER\Software\Microsoft\Office\12.0\Outlook\Security

or

HKEY_CURRENT_USER\Software\Policies\Microsoft\Office\12.0\Outlook\Security

Value Name: OutlookSecureTempFolder
Data Type: REG_SZ

If the value exists, and if the value contains a valid path, Outlook 2010 or Outlook 2007 uses that location for its temporary files.

If the registry value does not exist, or if the value points to an invalid location, Outlook 2010 or Outlook 2007 creates a new subdirectory under the Temporary Internet Files directory and then puts the temporary file in the new subdirectory. The name of the new subdirectory is unknown and is randomly generated, depending on your version of Outlook. In this situation, to locate this subdirectory, depending on your version of Windows and your version of Outlook, follow these steps.

For Windows 7 and for Windows Vista:

  1. Click Start, and then click Computer.
  2. Click Organize, and then click Folder and search options.
  3. On the View tab, make the following changes:
    1. Select the Show hidden files, folders, and drives option.
    2. Click to clear the Hide protected operating system files (Recommended) check box.
  4. Click OK.
  5. Continue with the next set of steps based on your version of Outlook.
    For Outlook 2010 and for Outlook 2007:
    1. Click Start, click All Programs, click Accessories, and then click Run.
    2. In the Run dialog box, type the following command (including the quotation marks), and then click OK.

      "C:\Users\ username \AppData\Local\Microsoft\Windows\Temporary Internet Files\Content.Outlook"

    3. Open the subfolder under the Content.Outlook folder whose folder name is a randomly generated sequence of letters and numbers. For example, FW0B6RID.
      Note There may be more than one subfolder with a randomly generated name under the Content.Outlook folder.

Source

http://support.microsoft.com/kb/817878

Friday, October 14, 2011

Cell Phone Frequency

Most premium mobile phones on the market today support four frequency bands for 2G – 850/900/1800/1900 MHz. This provides nearly global coverage. Japan and Korea are notable exceptions as they don’t have 2G GSM networks. For 3G, 2100 MHz is nearly globally accepted except for the U.S. 3G in the U.S. is divided by carrier (ATT – 850/1900 MHz, T-Mobile – 1700 MHz). In some countries additional frequencies are available to improve network capacity.

Let’s take the Dell Venue Smartphone as a specific example. Venue has two base product versions from the frequency band support perspective:

1.Version One has the following:

  • 2G support: 850/900/1800/1900 MHz (GSM/GPRS/EDGE)
  • 3G support (WCDMA): 850/1900/2100
  • This version supports quad-band 2G and 2100 3G, therefore it has largely global capability in either 2G or 3G. It also supports the 850/1900 MHZ bands required by AT&T in the US. This version would be recommended for consumers with AT&T service.

2.Version Two has the following:

  • 2G support: 850/900/1800/1900 MHz (GSM/GPRS/EDGE)
  • 3G support (WCDMA): 900/1700/2100 (1700 is also known as the AWS band)
  • This version also supports quad-band 2G and 2100 3G, therefore it has largely global capability in either 2G or 3G. It also supports the 1700 MHZ bands required by T-Mobile in the US. This version would be recommended for consumers with T-Mobile service.

In summary

AT&T 3G 850/1900

T-Mobile 3G 1700/2100


Source

http://www.dell.com/content/topics/segtopic.aspx/landing/locked_unlocked_phones?c=us&cs=04&l=en&s=bsd

Wednesday, October 05, 2011

AT&T Data Plan Codes


As of 10/5/2011. These are codes AT&T customer care agents can use in the AT&T computer system to get the necessary data plan.

$65 Unlimited international/domestic 3G data plan for iPhone : RIRPZ

$65 Unlimited international/domestic 3G enterprise data plan for Blackberry: RIRBG

$65 Unlimited international/domestic 3G data plan for Smartphone: RIRSZ

$45?? Unlimited domestic 4G enterprise data plan for Blackberry: HSTBW7

Monday, September 26, 2011

Upgrade or Repair a TiVo Hard Drive with InstantCake

InstantCake is the fastest, easiest and safest way to repair, replace or upgrade your TiVo hard drive without purchasing a pre-configured kit or installation service. Boot the custom CD in a standard PC and create a replacement drive for your TiVo DVR.

Currently 1 TB HD is the biggest HD you can upgrade to with this software.

I unplugged my primary HD and plugged the cables into the replacement HD.

Booted CD. My settings were HDA for the replacement HD and HDC for the cd drive. Note that you can press shift+up to see what assignment your drives have.

Source

http://www.dvrupgrade.com/dvr/stores/1/instantcake.cfm